MirageOS is a library operating system. An application written for MirageOS is compiled to an operating system kernel that only contains the specific functionality required by the application - a unikernel. The MirageOS unikernels can be compiled for different targets, including standalone VMs that run under Xen. The Xen unikernels can be deployed directly to common cloud services such as Amazon EC2 and Linode.
I have done a lot of MirageOS development for Xen lately and it can be inconvenient to have to rely on an external server or service to be able to run and debug the unikernel. As an alternative I have set up a VM in Virtualbox with a Xen server. The MirageOS unikernels then run as VMs in Xen, which itself runs in a VM in Virtualbox. With the "Host-only networking" feature in Virtualbox the unikernels are accessible from the host operating system, which can be very useful for testing client/server applications. A unikernel that hosts a web page can for example be tested in a web browser in the host OS. I am hoping that this setup may be useful to others so I am documenting it in this blog post.
My current VM is based on Ubuntu Server 14.04 LTS with Xen hypervisor 4.4 installed. The steps described in this post should be transferrable to other distributions if they support newer versions of the Xen hypervisor (4.4+). I have also included a list of alternative development environments for Mirage near the end.
Install the Ubuntu VM
First, create a new Virtualbox VM with at least 1 GB RAM and 20 GB disk and start the Ubuntu Server installation. How to install Ubuntu in Virtualbox is covered in detail elsewhere, so I will only briefly describe the most relevant steps.
To keep the VM lightweight, install as few features as possible. We will use SSH to login to the server so select "OpenSSH Server". You may want to install a desktop environment later, but keep in mind that the graphics support will be limited under two layers of virtualization (Virtualbox + Xen).
Give the Linux VM a hostname that is unique on your network as we will use this to access it with SSH later. I use "virtualxen".
Add a user you want to use for development, for example "mirage".
You may also want to reserve some of the disk space for Mirage if you plan to run applications that use block storage. During guided partitioning in the Ubuntu installer, if you choose to use the entire disk, the next question will allow you to specify a percentage of the disk that you want to use. If you plan to use Xen VMs that need direct disk access you should leave some of it for this purpose, for example 50%.
After completing the installation, run apt-get update/upgrade and install the Virtualbox guest utilities, then reboot:
sudo apt-get update
sudo apt-get upgrade
sudo apt-get install virtualbox-guest-utils
sudo reboot
Install the Xen Hypervisor
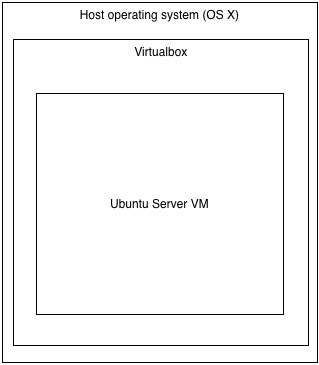
After installing the Ubuntu Server VM, your configuration will be as in the following figure. Ubuntu runs in Virtualbox which runs under the main operating system (OS X in my case).
We are now going to install the Xen hypervisor, which will become a thin layer between Virtualbox and the Ubuntu Server installation. The Xen hypervisor will be able to run VMs within the Virtualbox VM and we can use the Ubuntu installation to control Xen. This is the new configuration with Xen:
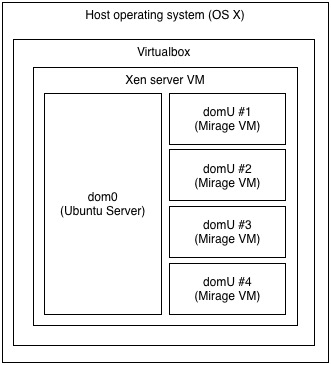
Dom0 is the original Ubuntu Server installation and the DomU's will be our future Mirage applications.
To install Xen, log in to Ubuntu and install the Xen hypervisor with the following command. We will also need bridge-utils (for configuring networking), build-essential (development tools) and git (version control):
# install hypervisor and other tools
sudo apt-get install xen-hypervisor-4.4-amd64 bridge-utils build-essential git
After the installation is complete, reboot the Virtualbox VM to start into Xen and the Ubuntu Server installation (which now has become dom0).
Xen can be controlled from dom0 with the xl command. To verify that Ubuntu is running under Xen, log in and run sudo xl list to show a list of running domains. The output should look similar to this:
$ sudo xl list
Name                                        ID   Mem VCPUs       State      Time(s)
Domain-0                                     0  1896     1      r-----         31.7
The only Xen domain running at this point should be Dom0.
We are now ready to set up networking.
Networking
Internet access should work out of the box for dom0, but to enable network access from the domU's we have set up a bridge device that they can connect to. We will call this device br0. Since this is a development environment we also want the unikernels to be accessible from the host operating system (so we can test them), but not from the local network. Virtualbox has a feature that allows this called a host-only network.
To set up the host-only network in Virtualbox we have to shutdown the VM (sudo shutdown -h now). Then go to Preferences in Virtualbox and select the "Network" tab and "Host-only Networks". Create a new network. Make sure that the built-in DHCP server is disabled - I have not managed to get the built-in DHCP server to work with Mirage, so we will install a DHCP server in dom0 instead. If you already have an existing host-only network and you disabled the DHCP server in this step, remember to restart Virtualbox to make sure that the DHCP server is not running.
After setting up the host-only network, exit preferences and open the settings for the VM. Under the "Network" tab, go to "Adapter 2", enable it and choose to attach to "Host-only Adapter". Select the name of the network that you just created in Preferences. Under advanced, select "Allow All" for "Promiscuous mode". Exit and save.
You can now start the VM with the new network configuration. After booting, edit /etc/network/interfaces to setup up the host-only adapter (eth1) and add it to the bridge (br0). The configuration below is based on the default IP range (192.168.56.x) for host-only networking in Virtualbox - if you have made changes to the default network configuration you may have to update the configuration here as well.
# /etc/network/interfaces
auto lo
iface lo inet loopback

auto eth0
iface eth0 inet dhcp

auto eth1
iface eth1 inet manual
    pre-up ifconfig $IFACE up
    post-down ifconfig $IFACE down

auto br0
iface br0 inet static
    bridge_ports eth1
    address 192.168.56.5
    broadcast 192.168.56.255
    netmask 255.255.255.0
    # disable ageing (turn bridge into switch)
    up /sbin/brctl setageing br0 0
    # disable stp
    up /sbin/brctl stp br0 off
Next, we install dnsmasq to setup a DHCP server in dom0. This DHCP server will be responsible for assigning IP addresses to the unikernels that attach to br0.
$ sudo apt-get install dnsmasq
To enable the DHCP server on br0, edit /etc/dnsmasq.conf and add the following lines:
interface=br0
dhcp-range=192.168.56.150,192.168.56.200,1h
This configures the DHCP server to run on br0 and to dynamically assign IP addresses in the range 192.168.56.150 to 192.168.56.200 with a lease time of 1 hour.
To be able to access dom0 via SSH from the host operating system (outside Virtualbox) we install avahi-daemon. Avahi-daemon enables mDNS, which will allow you to connect to "virtualxen.local" from the host operating system:
$ sudo apt-get install avahi-daemon
Reboot dom0 to activate the changes (sudo reboot).
You should now be able to connect to dom0 with SSH from the host OS:
$ ssh mirage@virtualxen.local
Dom0 can also be accessed from the host by using the IP address for br0 that we set above: 192.168.56.5.
Installing MirageOS in dom0
Before we can compile MirageOS unikernels we have to install OCaml.
# install ocaml and friends
sudo apt-get install ocaml-compiler-libs ocaml-interp ocaml-base-nox ocaml-base ocaml ocaml-nox ocaml-native-compilers camlp4 camlp4-extra m4
We also need the OCaml package manager, opam. A new version of opam was recently release and the version that comes with many Linux distros is outdated. To get the latest version (currently 1.2.x) I use 0install to install opam directly from the installation script provided on the ocaml.org web page. If you don't want to use 0install, a list of other options is available here (including PPA's).
# install 0install
sudo apt-get install zeroinstall-injector
# install opam
0install add opam http://tools.ocaml.org/opam.xml
0install installs applications in ~/bin. To add this directory to your path logout and back in.
After installing opam, run opam init and follow the instructions to complete the installation. Note that the opam commands should not be run with sudo, as it installs everything in ~/.opam in your home directory.
If you want to run the development version of Mirage, you can add mirage-dev as an opam repository. Keep in mind that this repository contains the latest changes to Mirage, which may not always work. The safest option is to skip this step.
# optional - add mirage-dev to opam
opam remote add mirage-dev git://github.com/mirage/mirage-dev
We can now install Mirage:
# install libs required to build many mirage apps
sudo apt-get install libssl-dev pkg-config
# install mirage
opam install mirage -v
After Mirage has been installed you should be able to run the Mirage configuration tool mirage.
$ mirage --version
2.0.0
If you use emacs or vim I also recommend installing Merlin, which provides tab completion, type lookup and many other useful IDE features for OCaml.
Creating a Mirage VM
To verify that everything works, we will now download the Mirage examples and compile the static website example. This example will start a web server hosting a "Hello world" page that we should be able to access from the host OS. The IP-address will be assigned with DHCP.
First, clone the Mirage examples:
# clone mirage-skeleton
git clone http://github.com/mirage/mirage-skeleton.git
Then go to the mirage-skeleton/static-webpage folder and run env DHCP=true mirage configure --xen. This command will download and install all the required dependencies and then create a Makefile. When the command completes, run make to compile.
If make completes successfully, there will be a file called www.xl that contains the Xen DomU configuration file for the unikernel. By default the line that contains the network interface configuration is commented out. Remove the # in front of the line that begins with 'vif = ...' to enable network support. The www.xl file should look similar to this:
name = 'www'
kernel = '/home/mirage/mirage-skeleton/static_website/mir-www.xen'
builder = 'linux'
memory = 256
on_crash = 'preserve'

# You must define the network and block interfaces manually.

# The disk configuration is defined here:
# http://xenbits.xen.org/docs/4.3-testing/misc/xl-disk-configuration.txt
# An example would look like:
# disk = [ '/dev/loop0,,xvda' ]

# The network configuration is defined here:
# http://xenbits.xen.org/docs/4.3-testing/misc/xl-network-configuration.html
# An example would look like:
vif = [ 'mac=c0:ff:ee:c0:ff:ee,bridge=br0' ]
The memory is set to 256 MB by default, but most of the example unikernels require much less than this. The static webserver example runs fine with 16 MB.
You should now be able to start the unikernel using the command sudo xl create www.xl -c:
$ sudo xl create www.xl -c
Parsing config from www.xl
Xen Minimal OS!
  start_info: 0000000000332000(VA)
    nr_pages: 0x10000
  shared_inf: 0x5457d000(MA)
     pt_base: 0000000000335000(VA)
nr_pt_frames: 0x5
    mfn_list: 00000000002b2000(VA)
   mod_start: 0x0(VA)
     mod_len: 0
       flags: 0x0
    cmd_line:
       stack: 0000000000291b40-00000000002b1b40
Mirage: start_kernel
MM: Init
      _text: 0000000000000000(VA)
     _etext: 000000000015cc0f(VA)
   _erodata: 0000000000197000(VA)
     _edata: 0000000000258220(VA)
stack start: 0000000000291b40(VA)
       _end: 00000000002b1b40(VA)
  start_pfn: 33d
    max_pfn: 10000
Mapping memory range 0x400000 - 0x10000000
setting 0000000000000000-0000000000197000 readonly
skipped 1000
MM: Initialise page allocator for 3bb000(3bb000)-10000000(10000000)
MM: done
Demand map pfns at 10001000-0000002010001000.
Initialising timer interface
Initialising console ... done.
gnttab_table mapped at 0000000010001000.
xencaml: app_main_thread
getenv(OCAMLRUNPARAM) -> null
getenv(CAMLRUNPARAM) -> null
Unsupported function lseek called in Mini-OS kernel
Unsupported function lseek called in Mini-OS kernel
Unsupported function lseek called in Mini-OS kernel
getenv(OCAMLRUNPARAM) -> null
getenv(CAMLRUNPARAM) -> null
getenv(TMPDIR) -> null
getenv(TEMP) -> null
Netif: add resume hook
Netif.connect 0
Netfront.create: id=0 domid=0
MAC: c0:ff:ee:c0:ff:ee
Manager: connect
Attempt to open(/dev/urandom)!
Manager: configuring
DHCP: start discovery

Sending DHCP broadcast (length 552)
DHCP response:
input ciaddr 0.0.0.0 yiaddr 192.168.56.178
siaddr 192.168.56.5 giaddr 0.0.0.0
chaddr c0ffeec0ffee00000000000000000000 sname  file
DHCP: offer received: 192.168.56.178
DHCP options: Offer : DNS servers(192.168.56.5), Routers(192.168.56.5), Broadcast(192.168.56.255), Subnet mask(255.255.255.0), Unknown(59[4]), Unknown(58[4]), Lease time(43200), Server identifer(192.168.56.5)
Sending DHCP broadcast (length 552)
DHCP response:
input ciaddr 0.0.0.0 yiaddr 192.168.56.178
siaddr 192.168.56.5 giaddr 0.0.0.0
chaddr c0ffeec0ffee00000000000000000000 sname  file
DHCP: offer received
                    IPv4: 192.168.56.178
                                        Netmask: 255.255.255.0
                                                              Gateways: [192.168.56.5]
 sg:true gso_tcpv4:true rx_copy:true rx_flip:false smart_poll:false
ARP: sending gratuitous from 192.168.56.178
DHCP offer received and bound to 192.168.56.178 nm 255.255.255.0 gw [192.168.56.5]
Manager: configuration done
The console output shows the IP address that was assigned to the unikernel ("DHCP offer received and bound..."). In the example above the IP is 192.168.56.178. From the host operating system you should now be able to open this IP in a web browser to see the "Hello Mirage World!" message.
If you login to dom0 in a new terminal xl list will show the running domains, which now includes "www":
$ sudo xl list
Name                                        ID   Mem VCPUsStateTime(s)
Domain-0                                     0  1355     1     r-----    6691.4
www                                         33   256     1     -b----       0.2
To stop the unikernel, run sudo xl destroy www.
Some alternatives
The environment described in this post is my current development environment and is based on a Xen server running in a Virtualbox VM with the latest versions of opam and Mirage. I use a host-only second network adapter to allow access to the Mirage applications from the host running Virtualbox.
Mirage applications can also be compiled in Unix mode, which produces an executable that can be executed directly in a Unix-like operating system. Currently OS X seems to be particularly well supported. This mode may often be the easiest way to debug and develop a Mirage application, but not all of Mirage's features are available in this mode and some applications may require low level access to the system - for example to block storage or network interfaces - which may not be available in this mode.
Another approach is to use a Cubieboard2 with a prebuilt Mirage/Xen image to set up a low cost, portable Xen server for development. If you want to have long running Mirage services in your local network or host your own web page this may be a good alternative. Note that compilation times can be slow on this platform compared to an x86 based VM.
An automated VM setup is being developed based on Debian, Vagrant and Packer here. This can be useful if you don't want to manually perform the setup steps outlined in this post. Currently this setup uses an older version of Debian which comes with Xen 4.1, but it should be possible to upgrade to Debian Jessie or later.